Search This Blog

Showing posts with label vegan. Show all posts

Friday, August 15, 2014

Customizable Beetroot Blush

Hi all!

Today I'm sharing an easy peasy method for making your own non-toxic, all natural blush! It only takes three ingredients and can be completely customized to your preferred shade!

All you need to get blushing is fine beetroot powder (I buy mine from Mountain Rose Herbs), arrowroot powder (can find in many grocery stores; similar to cornstarch), and cacao powder. If you're going for a more pinky color, you don't even need the cacao!


Start by putting about 1 & 1/2 teaspoons arrowroot powder into your container. If you have an old powder blush container, perfect! My blush is currently in a baggie until I can get a container, but works all the same (now I'm blushing ☺️)!

Now add beetroot powder incrementally until you reach your desired pink hue. For a more peachy, bronzed pink blush, add a small amount of cacao powder incrementally as well. To start, I recommend 1/4 teaspoon and you can build from there.


From the bottom left image above, I added another 1/2 teaspoon beetroot powder and 1/4 teaspoon cacao...my total amounts ended up being 1 & 1/2 teaspoons arrowroot powder, 1 & 1/4 teaspoons beetroot powder, and 1/2 teaspoon cacao powder. I have medium dark, olive skin so I needed a fairly dark blush to make an impact.


My finished product!!

Simply apply as you would regular powder blush. Make sure your face is moisturized prior to application, but give the moisturizer 10 minutes or so to set in before you apply. Moisturized skin will help the blush stick, but too much moisture might cause things to get  a little funky :)

Happy Blushing!
<3

Thursday, July 17, 2014

Green Tea Vanilla Bean Body Butter

Anyone else out there in an ongoing love affair with tea? I literally have a whole cabinet shelf dedicated to teas of all flavors and types....I would estimate I have around 40 different selections, conservatively. That being said, I don't always get through my teas before they reach their "best by" dates. It breaks my heart to throw anything out, so I either keep drinking it anyway or, as is the case here, make something from it.

I had a box of plain green tea approaching its date and decided, knowing all the wonderful properties of green tea, to make some new skin food with it! I opted for a super simple body butter using green tea-infused coconut oil and vanilla essential oil for scent. It smells absolutely heavenly and, thanks to some lingering tea bits, has endearing specks like vanilla bean ice cream...hence the name! As a former Starbucks Green Tea Frappucino addict, I would absolutely compare the scent to that! Coconut oil shines as a fantastic moisturizer, and green tea is loaded with antioxidants and great for use after sun exposure, making this a great addition to your summer beauty regimen!

Whipped Green Tea Vanilla Bean Body Butter
1 cup virgin coconut oil
2-3 tablespoons loose green tea, organic preferred
20-30 drops vanilla essential oil

In a double boiler, melt the coconut oil gently over medium heat. Once melted, add tea leaves and stir. Simmer, covered, over low heat for one hour to infuse the oil.


Strain tea out using cheesecloth, over a large chilled bowl (you can place your bowl in the freezer when your begin the simmer and take it out when you're ready for it). Allow oil to cool to room temperature; it should become slightly solidified. Once it has cooled, whip for a few minutes using an electric mixer on lowest speed until fluffy.


Note: if your house is warm and the oil does not solidify, you can place the bowl in an ice bath to help it set up. Warm temperature will also cause difficulty in whipping and may melt your finished product. Store in the fridge to keep it set up, and keep in mind that tea is perishable...use your product within about a month of making it.

Make a pretty label, slather on, and enjoy!!
<3

Wednesday, June 18, 2014

My Go-To Juice

I try my absolute bestest to juice every morning. Ideally, my morning routine is this: 20 minute of oil pulling (unless I work absurdly early, then I skip it), drink a liter of water with lemon, and have a fresh cold-pressed green juice. Admittedly, I sometimes struggle with getting out of bed those extra 20 minutes early to make my juice, but it really gets my day off to a positive start and I am always proud of myself when I do.

What do I typically juice? The following is my latest go-to juice recipe; it's what I have most mornings, though I sometimes switch it up with new and exciting recipes.

Note: This recipe does require a juicer. Making a smoothie from these ingredients would probably not be delicious =(

The Go-To Green Juice
 3-4 cups kale
1 pear, hard variety
4 Persian cucumbers (the little ones, or 1 whole large cucumber, peeled unless organic)
1 inch thumb of ginger (or more)
1 zucchini
1-2 Granny Smith apples
1/2 lemon

Juice all ingredients in the order listed, except for the lemon. Strain juice if desired (I usually do this, as I like a smooth and pulp-free juice). Squeeze in the juice from 1/2 lemon (over the strainer, to avoid getting seeds in). Drink within 15-20 minutes for maximum health benefits!


Sweet & Salty Scrub

Anybody else out there LOVE a good body scrub? I've loved them since I was a teenager...smooth, silky skin, deliciously-scented ingredients, a renewed purpose in life (okay, maybe I took that a bit far)..but seriously, what's not to love?

One of my favorite things about making my own body care products is how many of the ingredients I already have in my home...particularly, in my kitchen! I am a lover of all things food-related, so whipping up fresh ingredients into awesome personal care creations is a fusion I can't resist. Today I'm sharing a super simple, 5-minute recipe for a salt- and sugar-based scrub that will leave your skin soft, moisturized, and lightly scented. Best of all, the scent is totally customizable to your needs and preferences!

I made this batch up in an energizing, drool-worthy Tangerine Vanilla scent, but you could just as easily make a relaxing before-bed Lavender blend, an invigorating Peppermint version, or whatever tickles your (nose's) fancy. You could even leave it unscented if you prefer. Okay, I'm done babbling...here's the recipe:

Sweet & Salty Scrub
1/2 cup dead sea salt (or other sea salt)
1/3 cup raw sugar (mine is very coarsely ground, but you may prefer a finer sugar)
1/4 cup virgin coconut oil (or more, depending on how "liquidy" you want your finished product to be)
30-40 drops essential oils of choice (I used 15 drops tangerine and 25 drops vanilla)

Gently warm the coconut oil, on the stove or in the microwave, until liquid. Mix all ingredients together in a bowl, and transfer to an airtight jar for storage. Keeps about 1 month. Make sure you label your jar with a name and expiration date! A beautifully labeled jar is more tantalizing to use from, anyway =)


To use, simply scoop out a small handful either before or in the shower and rub gently over the skin (not for use on the face!). Then rinse!

Hope you all enjoy!
<3

Wednesday, July 10, 2013

Banana Oat Bread Cookies

This was one of those shared photos floating around on Facebook, so unfortunately I don't know the source of the original recipe. But it is great! These cookies are soft and chewy, slightly sweet and satisfying...perfect for a snack, breakfast, or to satisfy your sweet tooth! They are also super easy and quick (and I say that despite having to make 6 separate batches since I only own a toaster oven!). There is no added sugar, no gluten (provided you use certified GF oats), and virtually no fat (the only fat really comes from the almond milk, which works out to be less than 1/2 a gram!). Enjoy!

Banana Oat Bread Cookies
Makes about a dozen

3 mashed bananas (ripe)
1/3 cup apple sauce (no sugar added/natural)
2 cups gluten free oats (or use regular if you aren't sensitive)
1/4 cup almond milk, unsweetened
1/2 cup raisins (optional - I did not use)
1 tsp vanilla extract
1 tsp cinnamon

Mix it all up in a bowl, plop on a cookie sheet (I greased mine with a coconut oil cooking spray, since the cookies have no fat to help grease) and bake at 350 for 15-20 minutes. That's it!


Thursday, June 6, 2013

Green Chile-Tofu Migas

I have a really special recipe to share with you today! This one is from Quick Fix Vegan by Robin Robertson, a book that I am enjoying exploring and everything I've made from it so far has been great and easy! This dish takes less than half an hour to prep and cook, which I love. It includes lots of fresh ingredients that come together extremely well, and can be customized according to your tastes.
Migas is typically made with eggs, but of course this vegan version uses tofu as a stand-in. This has to hands-down be the best tofu scramble-esque dish I've made and is sure to become a staple in my house! You can make it as hot or as mild as you want, top it with whatever yummyness sounds good, and whip it up for a fancy brunch or a casual dinner - it fits well anywhere and will impress non-vegans!
As a tip, I used some small glass bowls to set aside my pre-chopped veggies, etc. so that they were ready to go in at the right time. I had everything prepped before turning on the skillet, because things come together quickly after that and I prefer not to stress while chopping onions, etc. =)
So without further ado, I share with you the recipe....

Green Chile-Tofu Migas
1 pound soft tofu, drained (I actually used firm tofu, as I prefer my scrambles to hold up better and really think firm makes a better stand-in for scrambled eggs)
2 tablespoons nutritional yeast
1/2 teaspoon salt
1/3 cup tomato salsa
1 ripe avocado
1 tablespoon olive oil
1 small yellow onion, minced
2 cloves garlic, minced
2 scallions, minced
4 (6-inch) corn tortillas, torn into bite-size pieces
1 (4-ounce) can chopped green chiles, hot or mild, drained
1 tomato, chopped
1 tablespoon minced fresh cilantro

Place the tofu in a bowl and mash well. Add the nutritional yeast, salt, and salsa and mix until well combined. Halve and pit the avocado, spoon out the flesh, and chop. Set aside.

Heat the oil in a large skillet over medium heat. Add the onion and cook until softened, about 5 minutes. Add the garlic, scallions, and tortilla pieces and cook until fragrant, about 2 minutes. Stir in the chiles and the reserved tofu mixture and cook, stirring, until hot and well combined. Add the chopped tomato and cilantro and stir to combine. Taste and adjust the seasonings as needed (here I added about a teaspoon of Himalayan black salt, to bring in that eggy flavor that vegan scrambles tend to lack - I recommend it!!)

Serve hot topped with avocado. Feel free to add vegan sour cream, additional salsa, hot sauce, dairy-free cheese, etc. as you wish!

In all its glory....and now I officially want to eat it right now!! Excited to share this one with my Mexican food-loving family!


Original recipe taken from Quick Fix Vegan cookbook by Robin Robertson.

Saturday, April 27, 2013

Raw Chocolate Cream Cheesecake with Strawberry Pecan Crust

It has been SO long since I've been on here, and I feel guilty for not being better about updating. Basically what it comes down to is a combination of four things: 1) I'm in grad school full time; 2) I work part-time at a super stressful and tiring evening job; 3) my wedding is coming up in October and I have tons of planning left to do; and 4) we are in the process of converting a studio apartment to move into at the end of May when our lease is up. Sooooo my time is a LOT limited at the moment.

That being said, I made this recipe on Thursday night and it is literally one of the best desserts I have ever had - vegan, raw, or otherwise. So I just had to share it with you guys! I found the recipe on Pure2Raw as I was searching for a celebratory dessert to make for my fiance, as he just finished his EMT class with flying colors.

This looked decadent and surprisingly simple, and indeed it was. I was a little short on cocoa powder so opted to do a strawberry crust instead. The crust as a result came out less cohesive and more crumbly, but I'm sure if you followed the blog directions to a T it wouldn't be. Here I've posted my version because I did enjoy the slight strawberry flavor that my substitution imparted.

Whether you've got something to celebrate or are just looking for a decadent, chocolatey treat - this one is for you! It is very high in fat so would be best to limit...and I'm telling you if you make it, you will eat all of it, so be careful! =)

Raw Chocolate Cream Cheesecake with Strawberry Pecan Crust 
(gluten free, soy free, raw, vegan)

For the crust:
1 cup pecan meal (or other nut meal)
2-3 tablespoons pure maple syrup
2 sliced fresh strawberries
pinch sea salt
1 teaspoon vanilla

Combine all ingredients in a food processor and pulse until it is sticking together slightly. Scoop crust into your pie tin and press firmly to make even.

For the filling:
2 cups cashew, pieces
1/2 cup coconut oil, liquid
1/2 cup maple syrup or 1/2 cup agave nectar (I used 1/4 maple syrup and 1/4 agave so no one flavor would overpower)
1/2 cup water
2 teaspoons vanilla
3/4 cup raw cacao powder

If desired, soak cashews for 10-15 minutes in water prior to use (I did not soak mine and it still worked perfectly-no chunks at all). Place cashews in blender with maple syrup/agave, vanilla, and water. Blend a minute or so, until creamy.

Add cacao powder and coconut oil. Blend until creamy (my blender was ANGRY at this step because the filling was so thick, but still so worth it!). Scrape down the sides of the blender as necessary.

Pour filling into pie tin over crust and smooth. Put cheesecake in the freezer for 2-3 hours to set. Devour!


The gorgeous finished product! Would be even prettier garnished with some sliced fresh strawberries!


Original recipe found here.

Monday, January 14, 2013

Vanilla Chia Tapioca Pudding

Happy Monday, everyone!

Today I wanted to share a snack/dessert that I made last night and which I think is terrific! It's super easy and can be made with things you probably already have in your house (if you're veggie, that is!). I skipped the vanilla beans because I didn't have any, but have no doubts they'd only make it tastier!!Also, the recipe I listed here is halved from what Kris wrote - otherwise it wouldn't have fit in my blender! Even half the recipe will be dessert for the rest of my week!

Vanilla Chia Tapioca Pudding, from Crazy Sexy Diet by Kris Carr
3.5 cups milk (brazil nut, hemp seed, cashew...I used almond)
1 tablespoon pure vanilla extract (without alcohol)
1/2 vanilla bean
1/6 cup agave nectar
small pinch of sea salt
1/2 cup chia seeds

Blend all the ingredients (minus the chia seeds) in a high-speed blender and pulse. Place the chia seeds in a large bowl and pour the mixture over them. Whisk. Continue whisking periodically so that the tapioca does not clump. My pudding took just under 1.5 hours to set, and I whisked a few times the first hour and that was it.

Get your Omega-3s...and enjoy them too!

For more recipes and information on Kris Carr and Crazy Sexy Diet, check out http://kriscarr.com/.

Thursday, January 10, 2013

Massaged Kale & Avocado Salad

On Tuesday, something I've been waiting a while for arrived on my doorstep: Crazy Sexy Diet by Kris Carr. I've heard so much about this book and I was so excited to read it...so much so I finished it by Tuesday evening! I'm looking to start the 21-day adventure cleanse after this weekend's camping trip, so I thought I'd try a simple recipe from it today. The recipe below I adapted from Kris's Shaved Kale Avocado Salad (contributed by Chef Sarno, www.rawchef.com).  It was simple, quick, and delicious! A little bit surprising with the cayenne, but I really liked it!

Massaged Kale & Avocado Salad (serves 2)
1 head kale, shredded
1 avocado, chopped
2 1/2 tablespoons olive or flax oil
1 1/2 tablespoons lemon juice (I used the juice of 1/2 lemon)
1 teaspoon sea salt
1/2 teaspoon cayenne
(Kris recommends 1 cup tomato or red bell pepper, diced...I would've added this if I had any, but enjoyed the salad anyway).

In a mixing bowl, toss all ingredients, squeezing as you mix (hence the title word "massaged") to wilt the kale and cream the avocado. Serve immediately.

Green & tasty! Pictured above is the recipe halved, since I was only making lunch for myself.

Bottom Line: A yummy, quick salad that fills the tummy with raw greens and healthy fats!


Learn more about the Crazy Sexy Diet and 21-Day Adventure Cleanse at http://kriscarr.com/products/crazy-sexy-diet/

Tuesday, January 8, 2013

Lemon Basil Pasta

This pasta is an easy, quick, one-pot meal from Everyday Happy Herbivore. I thought it was refreshing and tasty, but in the future would add more lemon (probably zest) for a bigger zing. I served it with roasted asparagus and a simple mixed greens salad with blackberry vinegar.

Lemon Basil Pasta
8 oz. whole wheat spaghetti (or rice spaghetti to make it gluten-free)
1 pint cherry tomatoes, sliced in half
juice of 1 lemon
1/4 cup fresh basil, chopped
2 tablespoons capers
black pepper, to taste
1 basil leaf for garnish (optional)

1. Cook pasta according to package instructions. A minute before pasta is done, add the tomatoes to the cooking water to cook with the pasta. You want the tomatoes to soften only slightly.
2. Drain and rinse the pasta in cool water briefly.
3. Return pasta to the pot and add the lemon juice, fresh basil, and capers; mix to combine. You can add more capers if you like the taste.
4. Garnish with fresh black pepper and a basil leaf.

I served a small amount of pasta on a plate loaded with veggies!

Bottom Line: A fairly basic but light, tasty pasta dish sure to please any crowd.

Sweet Potato Dal

Christmas was good to me this year...I got a total of four new vegan cookbooks, several geared towards quick meals that I am so far absolutely loving! The recipe I am sharing today is for Sweet Potato Dal, from Everyday Happy Herbivore by Lindsay S. Nixon. This book is chock full of delicious, easy recipes mostly made from staples in your pantry and that can be thrown together in 30 minutes or less! Plus, Lindsay's recipes are low fat or fat free, without added oils...this is something I am trying to get used to as a die-hard stir fry fan, but she is showing me the light! A little water or vegetable broth instead of oil and you can cut the fat and calories in your meal in a big way!
This dal, I thought, was absolutely perfect! A little spicy, pretty sweet, and with just enough flavor to pack a punch...plus, it's full of veggies, fiber and protein! I served it over brown rice because it was less soup-like and more of a stew. I loved it!!

Sweet Potato Dal
1 small sweet potato, skinned and diced into 1/4 inch cubes (I actually snuck in two potatoes out of sheer love for them!)
1 small onion, finely chopped
3 garlic cloves, minced
1-2 pinches red pepper flakes
1/4 teaspoon turmeric
1/4 teaspoon garam masala
1 cup vegetable broth
1/2 cup dried red lentils
4 cups spinach
salt, to taste

1. Line a medium pot with a thin layer of water and saute onion and garlic for a minute. Add a pinch or two of red pepper flakes and continue to cook until all of the water has cooked off.
2. Add turmeric and garam masala and stir to coat.
3. Add 1 cup of broth and uncooked lentils. Bring to a boil. Once boiling, reduce heat to low, cover, and simmer for about 5 minutes.
4. Add sweet potatoes, bring to a boil again, and reduce heat to low and simmer, until lentils are fully cooked (they expand and the sauce thickens), about 5 minutes more. Check periodically to see if you need additional broth (I had to add about 1/2 cup more).
5. Once lentils are cooked and sweet potatoes are fork-tender, taste. Add more garam masala if desired (mixtures differ in their strength).
6. Add spinach, continuing to stir until spinach cooks down and softens.
7. Season with salt to taste and serve (I did not need any additional salt, and as mentioned before I served this oven brown rice).

Colorful and delicious!

Bottom Line: If you enjoy Indian food, curries, or similarly-flavored dishes, make this ASAP! I know I'll be making it again soon!

Tuesday, November 13, 2012

Layered Raw Taco Salad (for two!)

Growing up in Southern California, I've cultivated quite a taste for any and all Mexican food. So, naturally, I'm always looking for ways to spruce up traditional recipes like enchiladas or tacos. When I found this recipe for a raw taco salad on Oh She Glows, I was really excited to try it!
I really enjoyed how the traditional elements of a taco salad were made non-traditionally in order to incorporate vegan, raw versions of them. This taco salad was flavorful, fresh and cooling on a warm night and packed full of powerful raw veggie and protein sources. Satisfying and delicious.
My nut cream sauce came out very chunky, as you can see in the photo...I think I just overwhelmed my food processor by putting too many nuts in at once (it is quite small), and could've achieved a better consistency by processing them in batches.

Layered Raw Taco Salad
Walnut Taco Meat:
1/2 cup walnuts, soaked for 2-8 hours
1 & 1/2 teaspoons chili powder
1/2 teaspoon cumin
fine grain sea salt, to taste
cayenne pepper, to taste (optional)

Nut Cream Sauce:
1 cup macadamia (or cashew) nuts, soaked in water for 2-8 hours
11-12 tablespoons water (use as needed to achieve desired consistency)
2-3 tablespoons fresh lemon juice, to taste
fine grain sea salt, to taste

3-Minute Guacamole:
1 large ripe avocado
1/4 cup chopped red onion
1/2 small tomato, chopped
1/2 teaspoon ground cumin
1 tablespoon + 1 teaspoon fresh lime juice
scant 1/4 teaspoon fine grain sea salt, or to taste

Other Salad Ingredients:
greens of choice
salsa of choice
green onion
crackers or chips 

Taco meat: In a food processor (or by hand), pulse (or chop) the ingredients until combined. Make sure to leave the walnuts chunky. Remove and set aside.
Cream sauce: Drain and rinse the soaked nuts. Add them into a processor and process. Stream in about 1/2 cup water and a couple tablespoons of lemon juice. Add more water as needed to achieve your desired consistency. The nut sauce should be super smooth and not grainy. Add salt to taste.
Guacamole: In a medium-sized bowl, mash the avocado flesh with a fork, leaving some chunks. Stir in the chopped tomato, red onion, lime juice, and seasonings to taste.
To assemble: (per bowl) Add a hefty base of greens in a large bowl followed by a heaping 1/4 cup scoop of guacamole in the middle. Spoon on 2 tablespoons of salsa over the greens followed by half of the taco meat. Add a couple tablespoons of cream into a plastic baggie, snip off end, and pipe over top the taco meat. Garnish with a chopped green onion and leftover chopped tomato and red onion. Place a few crackers/chips into the salad before serving.

Observe awkwardly chunky nut cream sauce...not so pretty but still tasty! Practice makes perfect =)

Bottom line: A healthy and tasty twist on a basic Mexican recipe, I would highly recommend this to any raw vegan foodies out there...and to those of you that aren't, just for the experience! Fun, unusual, and impressive to family and friends!


Recipe found here on Oh She Glows.

Grilled Tofu with Pineapple Salsa and Coconut Rice

Yet another recipe courtesy of Oh She Glows, this recipe is adventurous and delicious. It features a variety of flavors, from the delicate flavoring of the tofu to the spicy salsa to the sweetened rice. I highly recommend it if you need to break out of a boring dinner routine into an island-inspired flavor extravaganza!

Grilled Tofu with Pineapple Salsa and Coconut Rice
for the tofu:
1 package firm or extra-firm tofu
cooking oil for brushing
Herbamare or salt, for seasoning
for the coconut rice:
1/4 cup shredded coconut
1 cup dry/uncooked short grain brown rice
1 can (400ml) light coconut milk
2 teaspoons packed brown sugar
1 teaspoon coconut oil (optional)
Sprinkle of nutmeg  
 for the pineapple salsa (this makes over 5 cups, so you may want to only make half of a batch!):
1 pineapple, cored & diced
1/2 cup diced red onion
2 jalapeños, seeded and diced
1 large garlic clove, minced
1 red pepper, diced
1 orange pepper, diced
3 tablespoon fresh lime juice (from 1 large lime)
1/4 cup packed fresh mint leaves, minced
Red pepper flakes, to taste (optional)

First, you need to press the tofu. Remove tofu from package and rinse with water. Place a couple kitchen towels on the counter. Wrap the tofu with another towel, place another towel on top, and finally several heavy cookbooks on top. Let sit for at least 20 minutes to soak out the water.

After pressing, slice the tofu block down the middle, lengthwise to make two halves. Now slice each piece diagonally to make 4 triangles total. Brush each side with cooking oil and then season generously. This tofu is plain, but you can marinate it if you prefer.

Preheat oven to 300F. Toast shredded coconut for about 8-12 minutes until golden. Rinse brown rice in colander and then place into a medium-sized pot. Add the can of coconut milk and stir. Bring to a boil and then reduce heat immediately to low. Cover with lid and cook for about 25-30 minutes until most of the coconut milk is absorbed and rice is tender. Remove from heat, keep lid on, and let it “steam” for another 10 minutes or so. Stir in brown sugar and optional coconut oil. Garnish with toasted shredded coconut.

Meanwhile, add all salsa ingredients into a large bowl, adjusting to taste. Pineapple may need draining if it is very watery (to do this, place it in a colander for ~10 minutes prior to adding to the salsa mixture).

To grill the tofu, preheat the bbq grill for about 15-30 minutes  on high. Turn heat down to medium/low. Carefully, grease the grill with a cooking oil safe for high heat (e.g., canola, sunflower, safflower, or sesame). Grill the tofu for about 5 minutes on each side (this will vary). Be sure not to overcook the tofu or it will be dry. (**I don't own a real barbeque, just a miniature one without a top. So, to speed things up, I simply fried the tofu for a few minutes on each side. It didn't get a grilled flavor but was still tasty, especially because the other parts of this dish are so flavorful).

To serve, poon coconut rice on a plate and sprinkle with a dash of nutmeg if desired. Add grilled tofu next and then spoon over a generous amount of pineapple salsa. Sprinkle everything with more toasted coconut and garnish with mint leaves. Feel free to serve with a bit of BBQ sauce on the side to spruce up the tofu.


 Bottom line: This was an incredibly flavorful, sweet-and-spicy dish that I'd recommend for any palate craving some adventure. Also a great way to use up lots of aging kitchen produce, if you tend to have that problem like I do =)


Recipe found here on Oh She Glows.

Saturday, November 10, 2012

Roasted Butternut Squash with Kale and Almond Parmesan

I LOVE squash...all kinds, any meal, give me ways to cook squash up yummy and I will try them! This recipe, yet another from the wonderful Oh She Glows, was a tasty side dish with a nutty flavor perfect for fall weather. I will use a little more garlic next time around for more oomph (the nut flavor is very strong as is), but overall really enjoyed this dish.

Roasted Butternut Squash with Kale and Almond Parmesan
2-2.5 pound butternut squash
2 large cloves garlic, minced
2-3 tablespoons finely chopped fresh parsley
1/2 tablespoons extra virgin olive oil
1/2 teaspoons fine grain sea salt
1 cup de-stemmed and roughly chopped Lacinato kale
1/4 cup almonds
1/4 cup pecans
1 tablespoon nutritional yeast
1/8th teaspoon fine grain sea salt
1 teaspoon extra virgin olive oil

Preheat oven to 400F and lightly grease a casserole dish with oil.
 Peel the squash. Thinly slice off the bottom and top and then slice through the middle lengthwise to make two halves. Remove seeds & guts with a grapefruit spoon or ice cream scoop. Chop two halves into 1-inch chunks and place into casserole dish.
Add minced garlic, parsley, oil, and salt into casserole dish and stir until well combined with the squash. Do not add the kale yet.
Cover casserole dish with a lid (or tin foil with a few holes poked) and bake at 400F for about 45 minutes.
Meanwhile, process the parmesan ingredients together until chunky (or just chop by hand and mix in a bowl). Make sure to leave lots of nut pieces for texture. I used a mini processor and it worked great with minimal clean up.
After about 45 minutes (or when squash is just fork tender), remove from the oven and reduce heat to 350F. Stir in the chopped kale and sprinkle the parmesan all over the squash. Bake for another 5-8 minutes, until the nuts are lightly toasted. Watch closely so you don’t burn them. Remove and serve.


Bottom Line: A yummy dish with interesting flavors and textures, perfect for fall!


 Recipe found here on Oh She Glows.


Oil Free Chocolate Zucchini Muffins

I stumbled upon this recipe on one of my favorite websites, Oh She Glows. What intrigued me most about it was it is healthy enough to stand as a snack or breakfast item, but also sweet enough to be dessert.
These muffins came out very well, were slightly dry but that would be my only complaint. They were chocolatey and delicious!

Oil Free Chocolate Zucchini Muffins
1 flax egg (1 tablespoon ground flax + 3 tablespoons water)
1 & 1/4 cup lightly packed shredded zucchini, skin left on
1 & 1/4 cup almond milk
2 teaspoons apple cider vinegar
3 tablespoons pure maple syrup
1 teaspoon vanilla extract
2 cups whole wheat pastry flour (or all-purpose)
1/3 cup cocoa powder
1 tablespoon baking powder
1 teaspoon baking soda
1/2 teaspoon fine grain sea salt
1/2 cup cane sugar
1/3 cup dark chocolate chips
2/3 cup walnuts, chopped

Preheat oven to 350F and lightly spray muffin with oil or grease with Earth Balance butter.

Mix flax egg in a small bowl and set aside. Grate zucchini using a grater box (regular grate size). Set aside.
Mix almond milk and apple cider vinegar in a small bowl and set aside. It will curdle, but this is the point as we’re making vegan buttermilk.
In a large mixing bowl, mix together the dry ingredients (flour, cocoa powder, baking powder, baking soda, salt, and sugar).
Mix together the wet ingredients (flax egg, almond milk mixture, maple syrup, and vanilla) and then pour over dry ingredients. Stir until just combined. Fold in the chocolate chips, walnuts, and shredded zucchini.

Spoon batter into prepared muffin tin filling each tin 3/4 of the way full. Bake for about 15-17 minutes at 350F, or until muffins slowly spring back when touched. A toothpick should come out mostly clean. Cool in tin for 5 minutes. With a knife, loosen around the muffin edge and transfer to a cooling rack until completely cool.

Bottom line: These are versatile, sweet muffins that will satisfy a chocolate craving but are also healthful!


Recipe found here at Oh She Glows.

Tomato Basil Risotto

So...I've been failing miserably! Ever since classes started in October, I've been crazy busy with reading and assignments. I've been cooking and baking, but not blogging so I sincerely apologize for that. I am hoping to get better about managing my time so I can still post routinely. But today I'm going to do a series of posts of recipes I've made in the last few months.

This recipe I adapted from my Vegetarian Planet cookbook. I just altered the non-vegan ingredients to their vegan alternatives. It also called for parmesan, which I left out. It was simple, to the extent that risotto can be (it's a slight pain in the butt), but was tasty and hearty. It was reminiscent of Italian flavors without being overly so, and just hard a nice creamy tomato flavor.

Tomato Basil Risotto
2 1/2 cups water
2 cups almond milk
2 tablespoons Earth Balance butter
1 cup minced onion
1 garlic clove, minced
3/4 cup uncooked Arborio rice
3 tablespoons white wine
1 ripe tomato, seeded and drained of juice, chopped fine
kernels from 2 ears of corn (about 1 1/3 cups)
1/2 cup basil leaves, thinly sliced
1/2 teaspoon salt
fresh-ground black pepper to taste

In a saucepan,heat the water and milk to a simmer. Keep the pan over low heat.

Melt the butter in a large skillet over medium-high heat. Add the onion, and cook for 3-4 minutes, stirring occasionally. Add the garlic and the ride, and stir constantly for 1 minute. Add the wine and stir until completely absorbed. Begin to add the heated milk-water mixture 1/2 cup at a time, stirring frequently. Wait until each addition is almost completely absorbed (but continuing to stir often) before adding the next.

When the rice has cooked for 15 minutes and most of the liquid has been incorporated, add the corn kernels and tomatoes along with the end of the milk-water mixture. Cook, stirring frequently, until the rice is tender but still slightly chewy. The risotto should take 18-20 minutes of cooking in all.


Stir in most of the basil and the salt and pepper. Spoon the risotto immediately onto plates, top with remaining basil strands, and serve.
Tasty and good-looking  =)

Bottom Line: This is a nice end-of-summer dish, while the veggies are at their best, but would also be yummy for a winter meal if you can find them. It is a tasty and hearty addition to any meal.


Recipe courtesy of Vegetarian Planet, with alterations.

Thursday, September 13, 2012

Summer Soba Noodles

Yay! Two nights in a row of A+ recipes, according to Doug! I'm really excited about tonight's recipe as well. I made Soba with Toasted Sesame Seed Sauce, taken from my Vegetarian Planet cookbook. It was really easy and quick to make, although it is recommended that you let it cool 20-30 minutes to room temp (or if you're super hungry like me, you can refrigerate it for less time) before serving as it is wonderfully cooling and refreshing this way.
This dish has a tangy, authentic flavor and the soba noodles are silky and delicious. I opted to add extra veggies to make it a more complete meal; really you could add whatever veggies sound good to you, or add tofu for some protein. It was also really easy to make lots of extra, so now both of us have lunch to take for tomorrow! It's kind of silly how excited I get about that...but really it saves me so much time and effort!

Soba with Toasted Sesame Seed Sauce
1/2 cup hulled white sesame seeds
8 ounces dried soba noodles
2 tablespoons Chinese black vinegar or balsamic vinegar (I used balsamic)
1 tablespoon sugar
2-3 tablespoons soy sauce
1-2 tablespoons minced fresh ginger
1 garlic clove, minced
1 teaspoon dark sesame oil (I used toasted sesame oil and it was great)
3 scallions, both white and green parts, chopped fine (yay for food processors!)
3 cups small broccoli pieces or 2-inch asparagus pieces, blanced

Preheat the oven to 375 degrees. Pour the sesame seeds onto a rimmed baking sheet. Toast the seeds in the oven for 10-12 minutes, until they are a rich brown around the edges.

Meanwhile, bring a large pot of salted water to a boil. Add the soba noodles and cook for 5-6 minutes, or until they are just tender. Drain them, rinse them well with cold water, and drain them again.

In a large bowl, mix together the vinegar, sugar, soy sauce, ginger, garlic, sesame oil, and scallions. Add the noodles and the toasted sesame seeds. Stir well, then stir in the broccoli or asparagus. Let the dish sit for 30 minutes at room temperature before serving.


Bottom Line: You should probably make this! =)

Wednesday, September 12, 2012

Soup & Salad Combo, Please

Okay so I am excited about this one. These recipes, paired together, make a delightful lunch or dinner on a spring or summer day. The tofu salad is very cooling, which balances out the warmth of the soup. The soup would also be great in the winter time, when I usually picture squash in recipes. But I would HIGHLY recommend both of these, taken from Alicia Silverstone's The Kind Diet.

The tofu salad is quick and easy, just requiring some chopping of ingredients and a quick steam of the tofu. It would be great on toast or in sandwiches; I put mine on top of the pitas because I didn't have high hopes for the pita standing up to the heavy salad.

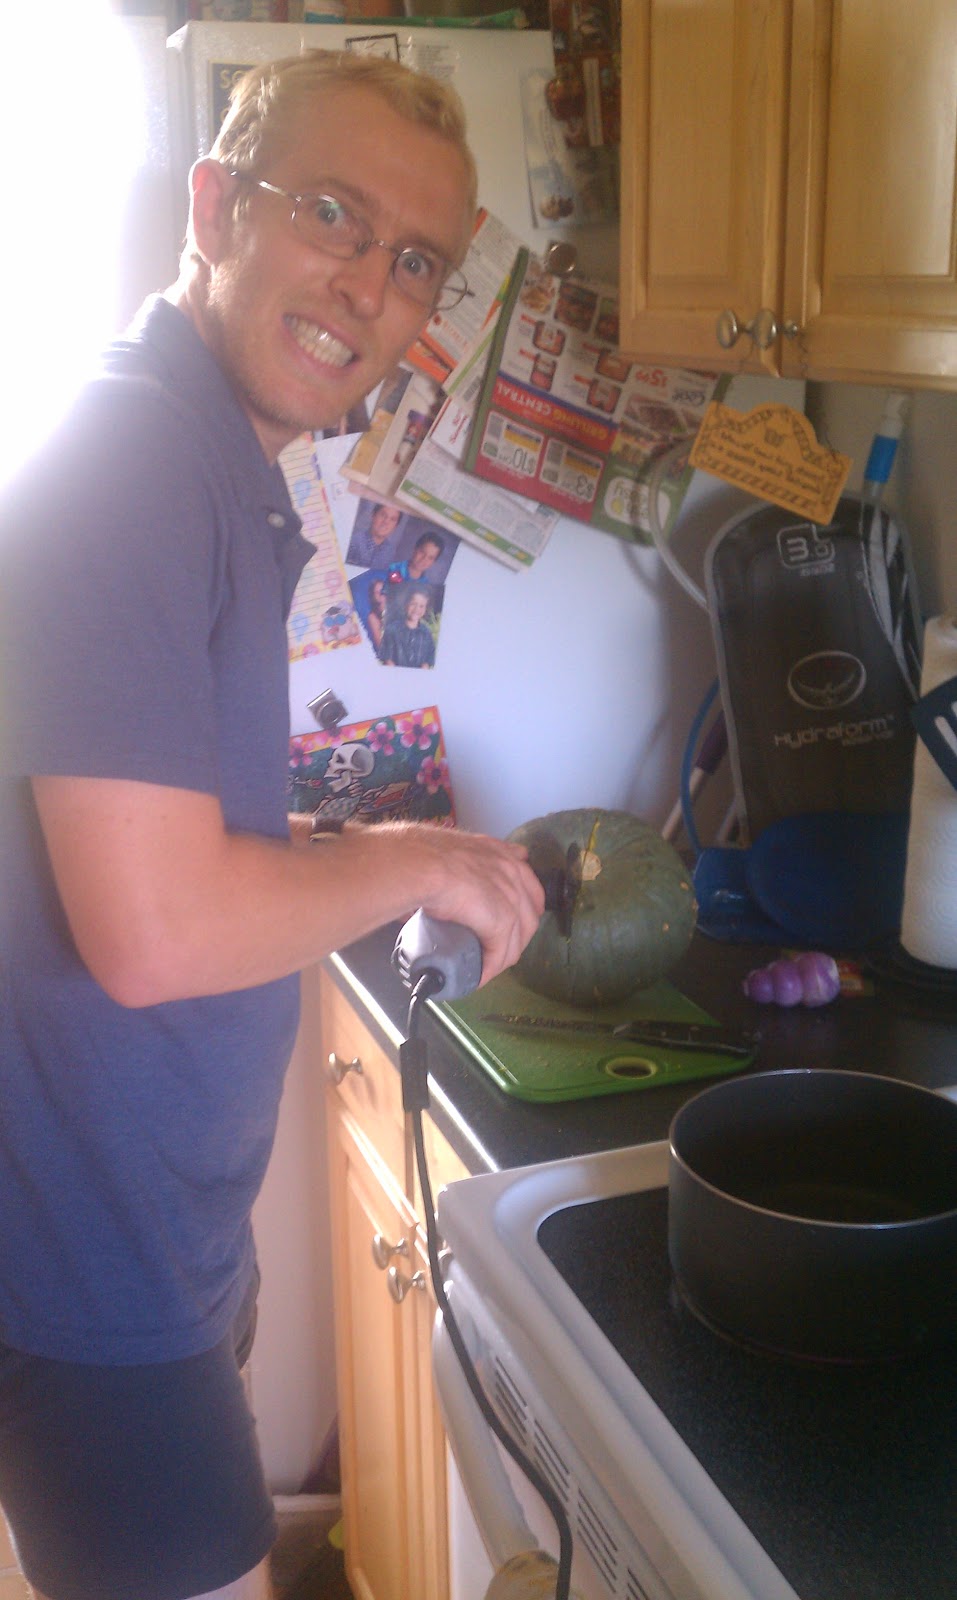
The soup is so incredibly simple...if you can just get the squash cut up! Kabocha squash has such a tough skin and is a very hard squash, so I find it very difficult to cut up and peel. Other kinds of squash could be substituted, even bought already cut up (such as butternut)...I just love the taste of the Kabocha so much that it is worth the battle!
A pretty frightening (albeit accurate) picture of Doug and his power saw at war with the Kabocha squash.

Creamy Sweet Kabocha Squash Soup
4 cups kabocha squash, peeled and cut into 2" cubes
2 pinches of fine sea salt (or 1 pinch salt, 1 teaspoon shoyu - this is what I used)
minced fresh parsley

Place the squash in a saucepan with 3 1/2 cups water. Bring to a boil, and add a small pinch of salt. Cover, lower the heat, and simmer for 15 minutes, until the squash is soft. Mash the squash with a potato masher, or blend with a handheld blender, right in the pot. Add another pinch of salt (or 1 teaspoon shoyu) and simmer for 7-10 minutes longer. Serve the soup hot with a sprinkle of parsley on top.

Soup served in a mug, as a side dish to the tofu salad

Tofu Salad
1/4 cup fresh, or frozen and thawed, peas
1/3 (14 oz.) package firm tofu
1/4 cup finely chopped celery
3 olives, chopped
1 tablespoon rinsed capers
2-3 slices kosher dill pickles, chopped
2 tablespoons finely chopped scallions or chives
1 tablespoon finely chopped parsley
1 tablespoon Vegenaise
1 tablespoon umeboshi vinegar or 2 tablespoons umeboshi plum paste
1 tablespoon fresh lemon juice
whole wheat pitas
green leaf lettuce leaves
1 red radish, thinly sliced (I don't really like radishes, so left this out)

Bring a saucepan of water to a boil. Add the peas, and blanch for 3 minutes or until the peas are bright green. Drain and set aside.

Wrap the tofu in cheesecloth or a clean dish towel and place on a plate. Place a second plate on top of the tofu, and place a weight on top of it for 10 minutes to press out the liquid. Bring water to a boil in a steamer or pot fitter with a steamer basket. Unwrap the tofu and place it in the steamer basket. Cover the pot and steam the tofu for 5 minutes. Carefully remove the tofu and transfer to a bowl. Mash with a fork to make it crumbly.

To the tofu add the peas, celery, olives, capers, pickles, scallion or chives, parsley, Vegenaise, vinegar, and lemon juice. Taste the mixture. If it is too bland, add more umeboshi vinegar, a little at a time, to taste (I needed to add another splash or two to mine).

Spoon the tofu salad into warmed pitas with the lettuce leaves and sliced radishes, or serve on the lettuce leaves and garnish with the radishes.

As good as it looks...reminiscent of egg or potato salad!

Bottom Line: Two ultra-healthful, Superhero recipes that taste so good yet are so simple to make! Definitely recommend both of them...impress your friends with lunch! =)


For more on Alicia Silverstone and The Kind Diet, visit thekindlife.com.

Tuesday, September 11, 2012

Risotto and Salad

Tonight I made up a couple of yummy-sounding recipes for the first time out of my Vegetarian Planet cookbook. This cookbook is not vegan, just meat-free, but these recipes were either vegan or were easily made so.
I was very impressed by the salad...even though the tomatoes I used were not fresh (oopsie! bad planning), it was still very flavorful and refreshing. Definitely will be making this again...it really reminds me of spring/summertime. One note: I had coriander seeds, but they were not ground. I used something called a suribachi, basically a mortar and pestle in which the bowl is ceramic and has grooves to assist in grinding. In a few short minutes I was able to grind the seeds. Definitely a handy tool to have around!
The risotto was interesting...a few strange flavor combinations, and it definitely could've used more of something, thought I am having trouble putting my finger on what. It was good, creamy and satisfying, but a bit bland...I'm thinking maybe it needed more garlic, scallions, or spices...a simple fix for an otherwise easy and yummy dish.
I did have extras after dinner for both of these...I think these recipes are intended to serve 4. I don't mind though...lunch is ready for tomorrow! =)

Bistro Avocado Salad
1 ripe Haas avocado, cut into 1/4 inch cubes
2 tablespoons lime juice (from about 1 lime)
1 yellow or red medium tomato, cut into 1/4 inch cubes
1/2 cup minced red onion
1 red bell pepper, seeded and cut into 1/4 inch squares
1 teaspoon brown mustard seeds
1/2 teaspoon ground coriander seeds
2 tablespoons extra-virgin olive oil
1/2 teaspoon salt
fresh-ground black pepper to taste
1 small bibb or Boston lettuce head, broken apart

Put the avocado into a medium bowl and stir in the lime juice. Add the tomato, red onion, red pepper, mustard seeds, coriander, and olive oil. Add the salt and pepper, and toss well. Optional: refrigerate for a few hours for a colder salad.

Create a bed of lettuce leaves on your plate. Spoon the salad onto them and serve.

Using my suribachi

Salad finished product

Wild Risotto
1 cup water
1/4 cup uncooked wild rice
4 cups vegetable stock (or water)
2 teaspoons olive oil
6 scallions, both white and green parts, chopped fine
2 garlic cloves, minced
1 1/2 cups uncooked Arborio rice
1/2 cup dry white wine (I know basically nothing about wine, so just picked up a $1.99 bottle of white at Whole Foods)
1 teaspoon chopped fresh tarragon, or 1/2 teaspoon dried tarragon
2 plum tomatoes, chopped
2/3 cup coconut milk
1 cup fresh, or frozen and thawed, peas

In a saucepan, bring 1 cup of water to a boil. Add the wild rice, cover the pan, and reduce the heat. Simmer 25 minutes. Drain the rice.

In a saucepan, bring the 4 cups stock or water to a simmer and keep it hot.

In a large skillet. heat the olive oil. Saute the scallions and garlic over medium-high heat for 1 minute. Add the Arborio rice and stir it for 2 minutes. Add the wine, the wild rice, and the tarragon. Cook, stirring frequently, for 2 minutes, then add 1/2 cup of the heated stock or water. Stir frequently until liquid is absorbed, then add 1/2 cup more stock or water. Continue adding the stock or water in this manner, waiting between additions until the liquid is absorbed and stirring frequently. After about 18-20 minutes, most of the liquid should be used, and the rice should be tender but still slightly chewy.

 Sauteing the Arborio rice and scallions

When all of the stock or water is used, add the tomatoes, coconut milk, and peas. Stir the mixture and simmer it, stirring often, until most of the liquid is absorbed. Serve at once.

Finished risotto. The yellow color comes from the vegetable stock I used.

Dinner is served!

Bottom Line: Both tasty, surprising dishes that I would make again. Only changes would be fresh tomatoes for the salad, and more "oomph" by way of some more spices in the risotto. I think the coconut milk might have been responsible for muting the flavor a bit.


Recipes both taken from Vegetarian Planet, written by Didi Emmons.

Monday, September 3, 2012

Gone Bananas

Growing up, I always loved when my mom baked banana bread. It was one of my favorite things she made, and she always did so when we had overripe bananas that we couldn't use for anything else. So today, when I found myself with a whole bunch of overripe bananas, I decided to bake some banana bread! I have used her recipe before, but of course this time needed to find a vegan one.
To the rescue comes Post Punk Kitchen, a fun vegan recipe website with some interesting posts. I found a simple recipe for banana bread for which I had all the ingredients already so I was off to baking right away!

Banana Bread
1/2 cup brown sugar
1/2 cups white sugar
1/2 cup margarine, at room temperature (I use Earth Balance)
3 very ripe bananas, mashed well
2 cups flour
1/2 teaspoon baking soda
1/4 cup non-dairy milk (I used almond milk, the original calls for vanilla soy milk)
1 teaspoon vanilla extract
1 teaspoon cinnamon
1/4 teaspoon allspice
1/2 teaspoon salt

Preheat oven to 350 degrees F. Lightly coat 8 x 4 bread/loaf pan with margarine or cooking spray.
Combine dry ingredients in a bowl - flour, baking soda, salt and spices.
Cream together the margarine and sugars. Add bananas, milk and vanilla extract.
Add the wet ingredients to the dry and mix well. (Confession: I also added chopped walnuts and some semi-sweet [still vegan] chocolate chips to the bread...in my book chocolate only improves things!!)
Pour batter into pan. Bake for 60-70 minutes, until a toothpick inserted into the middle comes out clean (mine was done right at one hour).

Fresh out of the oven!

The bread sliced and served well, even while warm. Not too crumbly but not too sticky! The loaf had a nice, slightly crisp top but soft underside.

Bottom Line: A quick and easy banana bread recipe that can be dressed up if desired. In my opinion the banana flavor was a little understated and it could have used a bit more moisture (probably due to the kind of banana bread I am used to), so perhaps could use another banana or some oil. But overall a delicious recipe worth trying! Would love to try it with some alternative sugars and flours to improve the health of the bread as well.


Original recipe found here on Post Punk Kitchen.